Thursday 1 November 2012

Sound

Sound

Wavelength of Sound

This is the distance from the crest of one wave to the crest of the next.
Sound is a compression wave in a medium such as air or water. When something makes a sound, the air is compressed  in waves that travel from the source in all directions.
When these waves reach your eardrum it vibrates and your brain registers it as sound.

Amplitude

This is the measurement of the degree of change (Positive or Negative) in atmospheric pressure caused by sound waves. That is to say that sounds with greater amplitude will produce the greatest changes in atmospheric pressure when compared to those with a lower amplitude.


Frequency of Sound

When sound waves travel through mediums they sometimes affect the objects they interact with. The Frequency of a sound refers to the number of times an individual particle in a medium vibrates in a certain period of time, most often 1 second. This is different to the speed of the sound, which is measured by how quickly a sound passes a certain point.


Decibels

A decibel or dB is a logarithmic unit used to describe a ratio, for example this ratio may be; power, sound pressure or voltage, it is the unit used to measure the intensity of a sound, the human ear can pick up a huge range of sounds from the slightest near inaudible sound of a finger rushing along skin to the sound of a jumbo jets engines.
The smallest audible sound is 0dB which is close to complete silence and the loudest the human ear can perceive without suffering instantaneous and painful damage is 140 dB however long term exposure to any sound over 80 dB can cause hearing loss.

Thursday 25 October 2012

Flash Progress Review

Flash Progress Review

Today we were tasked with finding a professional example of a flash interface either for an interactive website or for an online game, i decided to use two examples, one of a online game and the other of an interactive website. 
And also to review the current version of our flash interface (whether it is finished and complete or not), but because i have lost my flash interface and cannot find a recent copy of it i have chosen to review the last known version and state of my interface.

Looking at a professional example
Below is a professional example of a flash interface in the form of a game.

The End
The End is a free online flash game that combines simple strategy interaction and puzzle's with platforming elements to make for a simple but effective and highly addictive game produced by Channel 4 and created by BAFTA winning games studio Preloaded.
The game runs smoothly and while it may be a simple game it offers a lot of interaction with the flash interface through the character creator that you are taken to when first playing the game. It is a good professional example of a flash based user interface.

The website for the game and the trailer are below


Scan.co.uk
Scan is an online computer store that specialises in computer hardware, software at an affordable price for UK customers, as most major online computer retailers are based in europe, asia or more commonly in the US.
The interface for the website uses flash for all the drop down menus, selections, adverts and the interactive banners. It is an easy to use interface with very few if any glitches or bugs. All this and more makes it a good professional example of a flash based user interface.

The website and a screenshot of the user interface are below


Thursday 4 October 2012

Flash HCI - Progress

04/10/2012

Over the past 2 weeks we have been creating our Human Computer Interface using flash. Lately we have been creating our HCI icons and adding them into flash as fully interactive buttons.
These icons will be used to identify key points of interest along the routs used by our client for their Multi-Story Water Project.

Because these HCI's have to be accessible to anyone in the public we needed to make sure that the ideas and concepts for our icons were easy to identify and not too complicated. This meant designing them to follow basic recognizable elements used in icons on other forms of software and websites, such as Audio Control, which is usually shown as a speaker with several lines coming out of it to show whether there is sound coming out and how high the sound is. Or a back button in the form of an arrow or symbol that is identified with the previous page such as an image of a map to identify the back to the map icon.

The designs for my icons and HCI follow a dark industrialized theme, hence why i named the design 'Dark' and was to symbolize the dark technological boom in society that was Britain in the time of the industrial revolution.

Converting the icons to buttons has been the most difficult part of designing our HCI's thus far, as in many cases we had to recreate our icons in flash after drawing them by hand then editing them in Photoshop  Also applying the coding to the buttons to make them work and successfully interact with the different scenes and buttons inside the HCI's.

Thursday 27 September 2012

What i Need to Get Done

27/09/2012

Today i need to get all of the iconography planning for the icons of my interactive map into flash and into my map.
Before this however i need to make sure that my map is 100% complete.

Icons
I have 8 different icon ideas, for each idea i have several designs. I need to choose which designs are going to be used in my interactive map, scan them into Photoshop to complete them then import them into flash and apply them to my map.


Saturday 18 August 2012

Evaluation Unit 78 Phone Icons


Evaluation

For the final learning outcome for Unit 78 we were tasked to create a set of gaming icons for an iPhone/Smartphone.
We were told to select 4 or 5 genre's to base our work on and to come up with developmental planning for each (Shapes, Colours and Images associated with them). We then created our icons based around these genres, my chosen 4 were Sci-Fi, Fantasy, War and Horror i also originally had a 5th genre, Sport but because i fell behind i ended up dropping it.
To come up with my ideas i first(and mainly) looked at icons for games on the android market place. and then at icons on game digital distributors such as Steam. then began designing the concepts.

Because there were multiple final designs, one for each of my chosen genres, some have turned out better than others, for example my Fantasy and Sci-Fi icons are by far my best and i spent the longest creating. my War icon was a simple icon i created in a rush using one of my 3d models from Unit 66, so i didn't have high expectations for that one, and my original version of my Horror icon was rushed but turned out okay, however when i got more time closer to the end of the year i decided to add/redesign it, so i changed my final ideas to one of the designs i came up with with classmate inrek, this icon design ended up being of my best.

I was majorly disappointing with my time management skills for unit 78, by the end I left far too much work either unfinished or not started and by the time we had moved on, i was having to go back and add things to my U78 work, meaning i was getting further behind on my current work.
My time management would have been much better if i had gotten all the planning work done and out of the way as soon as it was given, this would have allowed me more time for my actual production work. In the future i will endeavour to keep work up to date and complete it on schedule.

Out of the whole icon making process I found getting used to using Photoshop the most difficult. The naming of all layers, pictures and elements was tough to get the hang of, not because it was difficult to do, I just kept forgetting to do it, but once I got the hang of it it made it much easier to keep my Photoshop files organised. also getting used to the tools effectively took some time. But by the end of the year (when I finally got all my Unit 78 work complete) I realised that I retained and remembered the skills I learnt this year.
The concept drawings, designing and developing my ideas were what I found the most enjoyable. this was also the work I got completed the quickest, but because I kept going back to it and adding further stuff to it, I didn't hand it in until the end of the year.

The basic designs of my icons were most comparable to some of the icons for games and applications on the Android (Google Play) marketplace. The easiest to compare would be my sci-fi icon and the icon for the 3D Space Invader game; 3D Invaders Beta - 3D Game, both of which have an image of a UFO as the central image of the design. Each of them contains basic traits easily identifiable with the Sci-Fi genre; Blues, Blacks and smooth designs. The largest difference is the fact that the Google play game uses a 3D image of one of the in-game models of a UFO while my icon uses an image i created in Photoshop, although the image on my icon is better (smoother, cleaner) looking than the image in the game icon, the fact that they have used an actual in-game element as a part of the icon means that their icon is advertising the graphical quality of their game on the android marketplace.

The majority of people i showed my designs to liked them, especially the Sci-Fi and Fantasy designs. I could  have improved upon the time it took to design and then digitally improve my designs in Photoshop.

If i could go back and do it all again i would have put as much effort into designing my war icon as i would have creating the rest of the i would have also gotten my 5th Icon (which was going to be sport) completed, instead i ended up dropping that genre because i was running out of time.

Throughout this project i have learnt how to create, modify and use layers more effectively in Photoshop, as well as becoming more comfortable using Photoshop.

Wednesday 15 August 2012

Lost Images

For some unknown reason all the images on my blog have corrupted  and are not visible on my blog.
i have fixed most of them by simply re-uploading the images, however some of the images i cannot find and will remain permanently lost.

Monday 25 June 2012

Evaluation Unit 33 Stop Motion Animation


Evaluation

For our Unit 33 stop motion work we had to organised ourselves into a group (2 groups of 5 and one of four). From there we had to brainstorm ideas and come up with a basic plan for creating said stop motion project.

My team consisted of Leanne, Inrek, Ciaran, Rory and myself. we decided originally to create an animation based around a classic 90's beat em up fighting game, such as Street Fighter & Tekken , this plan would require each of us to design or at least put in some constructive input into the design ofg their characters, we then needed to create said models with; wire, pipe cleaners, plastecine/play doh. And then build the models, at least 2 of each character, all the backdrops and scenes were to be created as a joint effort between me, Inrek and Leanne. We had however underestimated the complexity of creating models out of plastecine because they would become dry and brittle the longer they were left and would fall apart and disintegrate when we attempted to move them for the animating.

We could have managed our time better but most of our time management issues were because of our troubles with acquiring the materials necessary to create our models, we fell far behind in our production scheduled. because of this we ended up deciding to change our animation entirely because all of our models either disintegrated, dissipated or were squashed.

The idea for our new animation was conceptualized, mocked up and created in a couple of hours, we then used an inflatable whale that one of our tutors Dan had to be the central figure of our animation. So taking advantage of the good summer weather we took the whale outside and created ourt new animation of a land whale, swimming around on the lawn of the college garden. The overall animation turned out quite well considering its hasty creation and lack of content.

The animation flowed quite well when compared to a professional example but the projects rushed nature was clearly evident in the video, we did manage to put in some music which helped improve the video.
Despite all this the responses from class mates and other people whom viewed the video and filled in the survey was quite positive and they liked the quirkiness of the content. However if we could have done the whole project again we would have probably chose a theme,concept that wasn't as far outside of our skill set as our original concept.

Friday 22 June 2012

Unit 65 Flash Animation Concept Art

-Flash animation Title Screen-
This is the concept sheet for the title screen of my flash animation, detailing what I'm going to do and how im going to do it.

-Storyboard-
The above is a quick sketch i did for my storyboard to help plan out my animation.


-Character Sheets-
Below are the concept sheets for the two of my characters I used in my animation.

-Michael Concept Art-


-Rory Concept Art-

Thursday 21 June 2012

Evaluation Unit 69 Comic Strip

Evaluation
For Unit 69 we were tasked with creating a storyboard/comic strip using our own concept art ideas and worst, we were told that it had to contain "Narration-Speech & ACTION words with clear examples of Environment/Character/Natural & man-made forms" to help us develop our concept art skills and develop our ideas. After we had created the comic strip we then had to recreate it using Photo shop or Flash.

I started by coming up with a basic idea for a story, this was simple as I chose to make it around a bunch of character concepts I had previously made. The mane character of this was the Leviathan concept I came up with, so I already knew it was going to be a supernatural/fantasy based story. I finished coming up with and designing several secondary characters including, my main protagonist and the antagonist (The Leviathan) and came up with a story which set up my characters being sent on a mission to stop the Leviathan from rising and destroying the world.
After coming up with all the character concepts, background information and basic flow of the story, i then created the layout for my storyboard and decided on how the comic would be read, whether in traditional western form (left to right) or traditional manga format (right to left). and began sketching out the plan for the comic, laying the characters out, having them interact, drawing in the backgrounds ect.


When i was done with this i began to recreate the comic in flash, using the same method that one of my classmates (Inrek) came up with, which worked really well and i decided to adopt it into my comic style. However after losing my original version of my digital comic i moved on to other work thinking i'll come back later and finish it, however i ended up running out of time and submitted the work as it was.


As at first there was no final finished piece, the comic did not end the way i had intended it, however i did get a quick digital version of the first page of my comic done, which is what i submitted  as my final piece.But design wise and with the direction the story went and the was the hand drawn piece ended up, yes the comic strip did meet the intentions i originally had. However if i had managed my time better and got the work done as i was learning to use flash i may have gotten the final digital comic completed and sent off before i fell behind.

Because I'm more of a sketcher i prefer my hand drawn work, as such i found the initial concept sketches, character backgrounds and drawing out the comic easier than anything else, especially redrawing the comic out using Photo shop/Flash which is something that i struggle with (drawing digitally). If i had the chance i would focus more on practising using digital media to draw and given my self a better chance at creating the finished digital copy of the comic, however i did learn how to better draw my concept art and keep them all in-line with a similar drawing style, but saying thsi i enjoyed the overall experience and i liked my final product, and even though the final piece never became a reality people still said they liked my comic (the design, story, characters and layout).

Friday 1 June 2012

Evaluation Unit 65 Flash Animation

Evaluation

Using Adobe Flash we were tasked with planning and creating a flash animation, i had originally planned to create a interactive version of my comic strip however due to my limited skills in and general dislike of Flash i was unable to carry it out. i instead chose to create a simple animation based on my dislike of the software. it involves me and a friend in my class interacting at our computers.
I first created some concept sketches of several characters that were based off of my class mates that could potentially be used in my animation, i ended up settling on 2, the characters of me and Rory, i then refined the designs and attempted to draw them in flash. Then moving on to story and story board for the project.

Because i had initially planned on creating an interactive banner of my comic strip the final product i created does not meet my original intentions, and i ended up having to cut some of my final animation because it was taking too long to create. I ended up managing my time quite badly, i could have improved on my Time management if i had cut out all the unnecessary designs for characters i created and just used the ones for the characters i knew i would be using.

I struggled with the whole concept of animating in flash, i always ended up forgetting what i needed to do in order to make it work correctly, constantly having to go back and heck tutorials in order to get the work done. However i found the drawing of the characters and other images in flash to be easy when using a tablet, especially easy compared to photo shop which requires a lot more finesse when sketching/drawing/painting with a tablet.

Because flash can be used with a relatively limited knowledge base there are lots of professional examples where the quality of the animations/designs are not that different from amateur versions so i don't think my final piece came out looking too bad.

a few people thought that the concept and designs were good whereas the actual animation itself wasn't to the best of standards, which i do agree with.

I could improve of the general standard of the animation by having increased amounts of practice with the software. However if i could go back and do it again it would probably come out the same at the end, just maybe it would have taken less time

Wednesday 30 May 2012

Stop Motion Project Prezi

Tuesday 29 May 2012

Unit 78 Icons

Final Icons


Fantasy

Horror

Sci-Fi

War


Below is the final image of a screenshot of my phone with the icons overlaid


Monday 28 May 2012

Stop Motion Research - National Media Museum Prezi


Saturday 26 May 2012

Unit 13 Professional Practice - Show-reel Review

Digital Showcase

The digital showcase is a presentation of all the Games Dev course's (mainly 2nd year) work. It was shown in 2 rooms in the media department. Work was showcased in both rooms, showing the planning an development work of the 2nd year's game trailers and the final products (trailers) being shown on the main interactive whiteboard. The year 1 games presented some of their best work from the year, including 3D work, Planning ect. certain software that are used in the course were being demo'd to the public. The showcase is designed to promote the college and the course to the public (this included; parents of current students, siblings of students and prospective students), there was also prospective employers and the college governor.


I would say the digital showcase went quite well, it achieved its point to show of the games year 2 work and capabilities and successfully advertised the course to members of the public who showed interest in enrolling or enrolling their children. it also helped to show off the current games year 1 work (our year) which according to our tutors is some of the most creative work done in games dev at shipley college. After the showcase, the video's of the game trailers were uploaded to YouTube for students and the public to review. The review for the year 2’s trailers turned out to also be a good way to advertise the college and the course externally to a wide range of the public, evidenced by a few people enrolling after seeing it.

Friday 25 May 2012

Evaluation Unit 67 3D Animation Timed Assessment

Evaluation

For Unit 67, our 3D animation project we were tasked with creating an animation using 3DS Max. We were given a choice of whether to include the 3D assets we created in our Unit 66 unit or create new assets and include them in the animation. I decided i was going to do both, use asset(s) i had already created. My Fortis Defendre and create some new assets to work with it.
The plan i came up with was to create an island in the middle of the sea/ocean and have a fly-by of my Ship (Fortis Defendre) and include an explosion on the island, then have the shock wave of the explosion expand out from the island and hit the shields of the ship before it dissipates and the screen fades to black. The camera would also be moving towards the ship & island whilst orbiting the scene.

In the end the majority of the finished animation met my initial plans and intentions. I managed to create an island using a displacement map of Stewart's Island, i altered some of the settings to raise the bitmap texture of the island i had applied to a plane. Once this was done i needed to create the water for the island to sit on, this was done using a plane and applying a texture to it to imitate the ripples of water. I achieved this by using video tutorials on YouTube and although i managed to create the water texture and successfully applied it to the plane, it didn't have any blue tint to it and so the water was silverish and highly reflective. Although this is not what i had originally intended or wanted the end result was quite appealing so i kept it.

Because i had managed my time effectively i had more time that i had originally planned to edit the background assets for my scene, this involved creating a sky-box using a sphere, sky map, creating a sun using a light source asset and then some (a lot of) tweaking of textures and positioning of the light and sky. Once the skybox was up it reflected really well on my silvery sea, which i was really happy about.

Unusually for me on a final piece, i managed my time quite well, i had everything planned out and ready. as most of the assets were already created there wasn't a lot to do in the way of modelling so most of my time went into researching tutorials and animating. However the texturing and lighting took the most time as the positioning of the sky-box texture and the light source had to be pretty much perfect. This and fixing my island so that the edges of the plane i applied the island displacement map was applied to laid below the surface of the water plane, this however i failed to resolve before submission. I did, surprisingly  find creating the effects relatively easy and enjoyable, i spent allot of time researching tutorials on how best to make them and then implementing them in my work.

As this was my first 3D animation it doesn't really compare to any proffessional example, however i did try to imitate certain effects and camera shots i had seen in CGI from sci-fi films/TV shows and games i drew inspiration from, but i had minimal success.
Some of my class mates liked and found my highly reflective silver ocean amusing and good, complimenting me on my use of effects. However i could use more practice at this and improve upon it. Overall i believe the animation i made was a success and i doubt i would do anything differently given the chance.

Saturday 5 May 2012

Unit 33 Stop Motion Animation Research


Stop Motion Animation

Understanding the techniques and development of stop motion animation.

Persistence of vision

Persistence of vision is a theory that is most directly applied to animation. it is a simple yet controversial concept that states that the eye in conjunction with the brain can only process a certain number of images per second, and by flying these images at the viewer sequentially you create the illusion of motion from still images.

What this essentially means is the more images and the faster in succession these images are presented to the viewer means the easier and smother they seem to flow creating the illusion of actual motion where actually there is none.

"Persistence of vision is a commonly-accepted although somewhat controversial theory which states that the human eye always retains images for a fraction of a second (around 0.04 second). This means that everything we see is a subtle blend of what is happening now and what happened a fraction of a second ago."

(below is the end product of my experimentation with stop motion/flip books)


Stop Frame

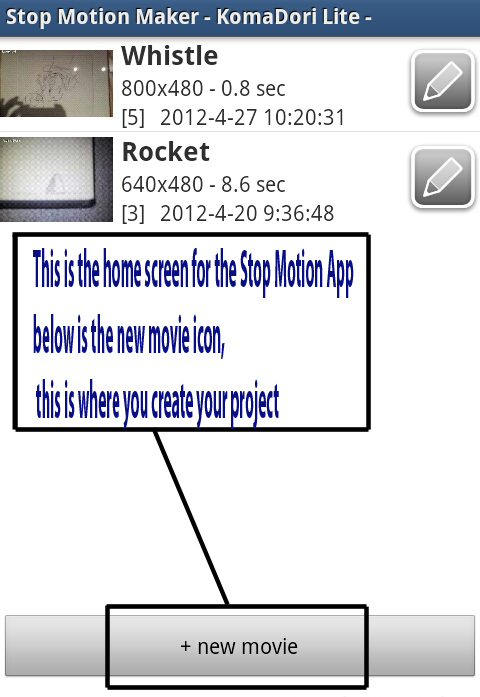
In relation to animated films stop-frame animation is the process of creating an animation by photographing each frame individually and then piecing them together piece by piece (or by use of an app, such as the Stop Motion Maker - KomaDori, like i used in the above video).

It is most commonly used in in claymation and puppet based animation, the objects are brought to life by incrementally breaking up the figures motion and filming one frame of film per increment.

This technique is almost as old as film it's self. Film makers needed a way to animate objects on screen so the technique was devised. The earliest credited usage was in 1897 when J. Stuart Blackton and Albert E. Smith brought a toy circus alive in Humpty Dumpty Circus.

(below you will find a bunch of images i used to make my above animation of a rocket launching)


Frame Rates

Frame Rates are how many images of a movie are displayed every second a movie is played. The higher the frame rate the move has, the smoother objects move in the movie. Frame rates are measured in FPS or Frames Per Second.

If you compare a movie with low FPS to a movie with high FPS, the movie with a higher FPS has more frames for the same number of seconds of film. It will also be stored in a larger file. Game frames are essentially the same thing, the only difference between a movie and game frames is that game frames are created as you play whereas movie frames are recreated from a file.

Different forms of film in different areas are shown at different FPS:
. Films in cinemas are shown at 24 FPS.
. TV shows are broadcast at 50FPS in PAL(Europe) and Secam(Asia) formats.
. In the USA the TV format is NTSC broadcast at 60 FPS and is updated at 30 FPS.

The human eyes detect images at well over 200/300FPS but in combination with the brain, most of this information is stripped away effectively limiting it to 20 or so FPS.

Development

Pioneers

Joseph Plateau:


Joseph Plateau was born in Bruxelles (Brussels) in 1801. in 1822 Plateau graduated from the Athenaeum, his tutor advised him to study literature and philosophy at the University of Liege, with the aim of studying Law. Law was a natural choice as his guardian was a lawyer, however he wanted to go on to do the subjects he loved, and chose to study them after gaining a bachelors degree in law.

The Phenakistoscope

The Phenakistoscope (meaning deceptive view) is a toy that was created by Joseph Platue in 1832. much like other early animation devices such as the Thaumatrope, it uses the persistence of vision to achieve the illusion. The only other things required to view the animation is a mirror and a push pin.

"The user holds the Phenakistoscope up to a mirror, with the animated side facing away from them and spins it around the push pin while looking through the slots. This creates a strobing effect, with each slot allowing only a brief view of the animated side, and each time showing a slightly different view of it."

(this was the only one of the animators that i couldn't record the effect of, this was because the effect produced by the animator could not be picked up, it instead only picked up the movement of the wheel it's self.)

William Horner:


William George Horner, born 1786 was a British mathematician and school master. he is best known and widely only remembered for the Horner's Method of solving algebraic equations ascribed to him by Augustus De Morgan and others.

The invention of the Zoetrope in 1834 (then under the name Daedaleum) has been attributed to him.


Zoetrope

The Zoetrope was created in 1834 by William Horner, then called the Daedaleum, meaning 'The Wheel of the Devil'. The Daedaleum didn't become popular until the 1860's when it was patented in both England and America, which is when it was given its current and well known name by William F. Lincoln, Zoetrope, which means 'Wheel of Life'.

The Zoetrope works of the same principles as the Phenakistoscope, however the pictures were drawn on a strip which would sit in the bottom third of a metal drum with slits cut into the upper section of the drum.

"The drum was mounted on a spindle so that it could be spun, and viewers looking through the slits would see the cartoon strip form a moving image. The faster the drum is spun, the smoother the image that is produced."

Charles-Émile Reynaud:


Emile Reynaud was a French inventor, artist and showman. born on 8 December 1844 to horologer and medal engraver Benoit- Clade-Brutus Reynaud and artist and school teacher Marie-Caroline Bellanger. From an early age his parents took care of his education, as such he learned skills such as; precision mechanics from his father and his mother taught him to draw and paint. At 14 he was already very knowledgeable in literary and scientific matters, apprenticing to a precision engineer in Paris and later studying with photographer and sculpter Adoam Salomon.

When he was 29 he became a professor of physics and natural sciences which he taught from 1873 to 1877. It was during this time that he created the Praxinoscope, his most famous and notable invention. He moved into an apartment at the Rue Rodier in Paris with his mother. Using the adjacent apartment as a workshop where the Praxinoscope were produced.

Praxinoscope

The Praxinoscope was invented in 1877 by French inventor Charles-Emile Reynaud, it is a precursor of the moving picture. the Praxinoscope functions by having a band of pictures, each slightly different to its neighbour, is placed inside a rotating drum (similar to the arrangement in the Zoetrope).
In his original design of the Praxinoscope, the pictures were viewed by reflection through a series of narrow vertical mirrors placed at the centre of the drum.

"The drum is spun by hand, and the horse appears to gallop."

Thomas Edison:


Thomas Alva Edison was born 11 February 1847 into a middle-class family, he was the youngest of 7 children and the slowest to develop, he didn't learn to speak until the age of four. Because of this he began to ask any and every adult he met to explain to him how everything he encountered worked.
After this insistent and seemingly self-centred behaviour finally broke his over worked and short tempered teacher, his mother pulled him out of school to be home taught. His mother whom firmly believed that his unusually broad forehead and larger that average head only served as proof of his remarkable intelligence.

Because of his poor hearing, he was unable to take advantage of a contemporary secondary education in maths, physics and engineering, this however never stopped him finding ways of absorbing the knowledge he desired, and developed his own individualistic style of learning.

Kinetoscope

The Kinetoscope was originally envisioned by Thomas Edison in the early 1880's filing his first patent in October of 1888. however the Kinetoscope which became the final product, was mostly worked on by Edison's assistant W.K.L Dickson whom Edison hired in the Spring of 1883.

One of the most challenging aspects of creating the Kinetoscope, was the design and creation of the photographic medium for presenting the micro-photographs, the breakthrough for this problem came with the launch of photographic quality celluloid by John Carbutt.

"The initial prototype was actually a 'taking device' - camera, but could be converted to a projector by shining a light through the film and lens."


The peep-hole version which is recognised as 'The Kinetoscope' was ready in a prototype version by the end of Summer 1892, the mechanism was contained in a wooden cabinet with a peep-hole in the top with which people could view the film through.


Developers

Ray Harryhausen


Ray Harryhausen was born on the 29th June 1920. Growing up his parents always encouraged and never dissuaded Ray from his unusual obsession with fantasy and films.

Ray Harryhausen stands out as being one of the most successful and greatest stop-motion animators of ll time, the other being Willis O'Brian, and 3 decades kept his unique field alive almost single handedly.

Ray made his name in the 50's through 70's by creating fantastical stories and creatures based on myths and legends, thus creating a unique genre of fantasy films that took the movie making world by storm.

Some of Ray's most notable works are; The Beast From 20,000 Fathoms (1952), It Came From Beneath The Sea (1955), Jason And The Argonauts (my personal favourite) (1963), The Golden Voyage Of Sinbad (1973).


Jan Svankmajer

Jan Svankmajer is one of the greatest Czech fimakers, he was born in 1934 in Prague where he still lives. Jan has trained at the Institute of Applied Arts and at the Prague Academy of Performing Arts (Department of Puppetry). during this time he became involved in the Theater of Masks and the Black Theater.

Making his first film in 1964, for over 30 years Jan has made some of the most memorable and unique animated films ever made. As such he has gained a reputation as one of the worlds foremost and renown animators, influencing the best of the modern filmmakers from Tim Burton to the Brothers Quay.

Some of Jan Svankmajer's work includes; Alice (1988), Faust (1995), Scenes From the Surreal (1999).


The Brothers Quay

Stephen and Timothy Quay (known as the Quay Brothers) are two of the worlds most original filmmakers. Stephen and Timothy Quay are identical twin brothers born on 17th June 1947 in norristown Pennsylvania. During their time studying in Pennsylvania they would begin studying the films and works of Luis Bunuel, Carl Theodor Dreyer as well as, Andrei Tarkovsky and Ingmar Bergman.

These screenings would be incredibly influential for them, resulting in them deciding to create their own films. After graduation in 1969, they moved to study in England, it was at this time that they would make three short animated films: Der Der Loop Loop, II Duetto and Palace in Flames.

A short list of a few of their films and projects other the years (including both live action and animation).


Tim Burton

Tim Burton, Born 25th August 1958 in Burbank, California. From a young age Burton was a huge fan of monster movies, such as: Godzilla, The hammer Horror Films and the work of Ray Harryhausen. In 1976 he attended the California institute of the Arts after a few years in 1979 he was drafted to join the Disney animator ranks working on The Fox and the Hound. In the next few years he found the work as an animator tedious, and it "bored him silly". Disney chose to make him a conceptual artist, beginning work on the animated movie 'The Black Cauldron' this work was seen as too 'dark' so it was not used, he was instead set loose on his own project, which would, years later, become The Nightmare Before Christmas.

He would later go on to make some of the greatest animated and live action films of all time, including:


Aardman Animations

Aardman Animations is a British animation studio, best known for its clay animation works, such as the adventures of Wallace and Gromit. Aardman Animations was founded in 1972 by Peter Lord and David Sproxton to realise their dreams of creating an animated picture. In 1975 they created a segment called Greeblies using clay animation, which became the basis and inspiration for creating Morph, the iconic simple clay character.

In 1997 Aardman and DreamWorks teamed up to create the animated film Chicken Run, Aardmans first film. released in 2000 Chicken Run was a great financial and critical success.

in 2005 after 10 years Wallace and Gromit returned in Wallace and Gromit: The Curse Of The Wear-Rabbit. The following year they created their first computer animated feature, Flushed Away.

Monday 30 April 2012

First Attempt at Creating a Flip-book or Stop-motion Animation


In todays lesson we were tasked with creating a flip book so that we could experiment with different forms of animation and learn about persistance of vision (see my previous post).
I decided to make my flip book about the launch of a missile, once it reached orbit it cuts it's engine and transforms into a satelite and opens fire on a city on the planet, the smoke is then erased to show the end image, a simple "THE END"

We were all creating our flip-books and whilst creating mine I realised I did it the wrong way around, so after erasing and then recreating my flip-book I realised that the paper I drew it on was too thick to flip.
In order to finish the work set to us and salvage all the drawings I had done, I decided to seek salvation in the Android (Google Play) market place. After 2 minutes of searching I found salvation in the form of the Stop Motion Maker - KomaDori app, which is designed to quickly and effectivly create a stop motion animation with much of the hard work cut out.
'the Stop Motion Maker app on the android market place'


I began taking pictures of the images I had so far created using the app to first test make sure the animator worked, after a quick test I found it did indeed work and decided to proceed working on the rest of the animation.


The app works by allowing you to create a project, within which to store all of your images.


When created the app asks you to pick a resolution for the camera. All images are taken by the in app camera which can be set to be operated automatic (the camera captures images every fraction of a second or so) or manual (all camera functions are operated manually by the user).


After this the app takes you to the camera where to take a photo you just tap the screen, after you have taken all the photo's you wish to put in you animation you just click the exit button to take you to the view project section.


The view project screen, is a screen that the app takes you to when your project is completed, here you can go over your work and make sure it works the you want it.


When you have created your project you can go back and select edit mode


 On the edit screen the app allows you to save, add new images to or delete your project, you can also preview it.

Saturday 31 March 2012

Unit 69 Concept Art

In this post i am going to put up images of all of the concept art i have created for my Unit 69 work

--Concept sketch for Panel 2 of Page 1--
 --Original hand drawn version of Page 1--
--Original hand drawn version of Page 2--
 --Original hand drawn version of Page 3--
 --Original hand drawn version of Page 4--
 --Original hand drawn version of Page 5--
-- Concept art for an Assassin character not included in the final comic--
--Concept art for a Fallen Angel not included in the final comic--
--Initial concept drawing of the Leviathan--
--Initial concept sketch for Marisha The Black Witch--
--Final concept sketch for Marisha The Black Witch--
--Initial concept sketch for Saris and Tora--
--Final concept sketch of Saris and second concept sketch of Tora--
--Final concept sketch of Tora--
--Emblem design for L.E.G.I.O.N.--